> ## Documentation Index
> Fetch the complete documentation index at: https://docs.bethelchms.com/llms.txt
> Use this file to discover all available pages before exploring further.
# Setting up ministries
> Create ministries, assign members with roles, manage rosters, and archive or delete ministries in Bethel ChMS.
A ministry in Bethel ChMS is an organisational grouping for teams, departments, or service groups within a branch. Ministries are not events. They help you organise who is responsible for what, whether that's a worship team, an ushering department, or a children's ministry.
**Who can do this:** Org Owner, Org Admin, Branch Admin, and Editor can create, edit, and manage ministry rosters. Org Owner, Org Admin, and Branch Admin can delete ministries and link groups. Editors cannot delete ministries or link groups.
Org-scoped users can switch branches before creating or editing branch records. Branch-scoped users work in their assigned branch.
## Creating a ministry
In the sidebar, click **Ministries**.
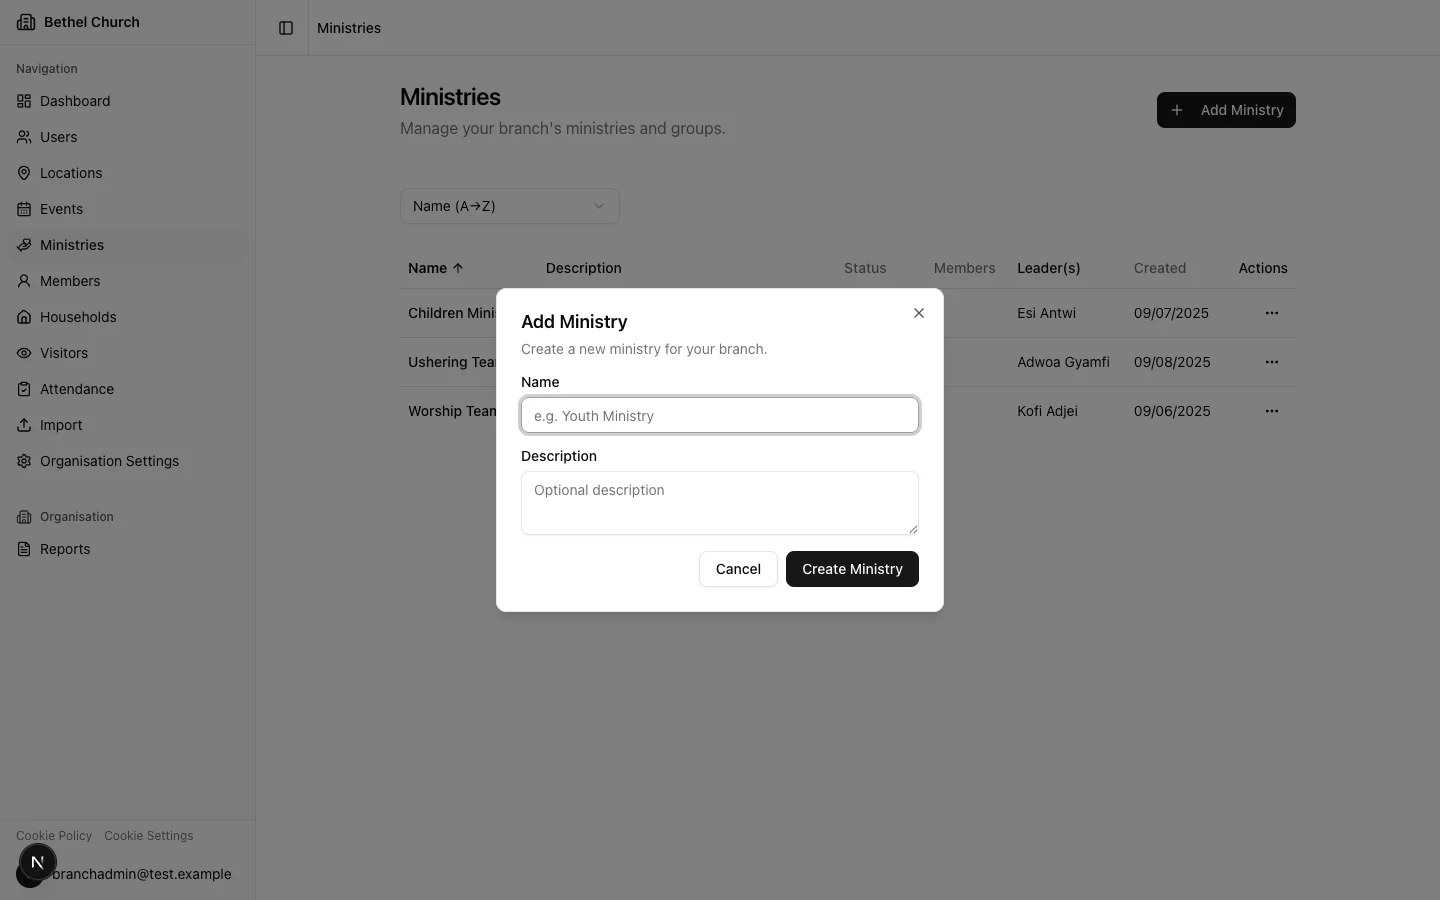
Click **Add Ministry**. A dialog will open with the ministry form.
Enter a **Name** for the ministry. The name must be unique within your branch. Optionally, add a **Description** to explain the ministry's purpose.
Click **Create Ministry**. The ministry is created with an **Active** status by default.
 ## Assigning members
Once a ministry exists, you can start adding members to it and assigning them roles.
Click on the ministry you want to add members to.
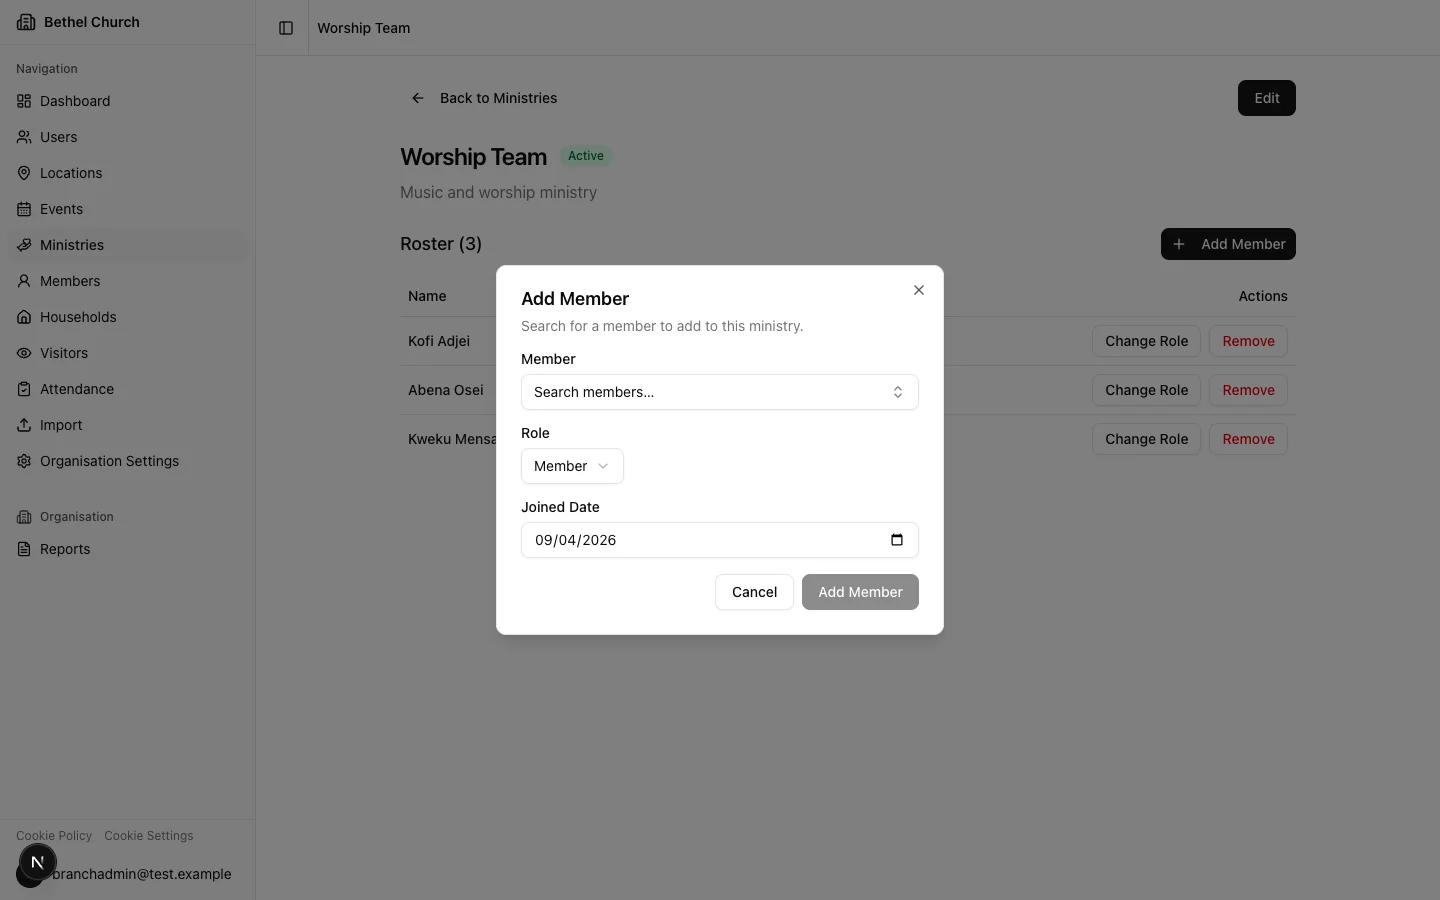
Click **Add Member**. A dialog will open with a search field.
Search for a member by name, then select them from the results.
Choose a role for this member: **Leader**, **Assistant Leader**, or **Member**.
Set the **Joined Date** and click **Add Member** to add them to the roster.
A member can only be assigned to a ministry within their own branch.
## Assigning members
Once a ministry exists, you can start adding members to it and assigning them roles.
Click on the ministry you want to add members to.
Click **Add Member**. A dialog will open with a search field.
Search for a member by name, then select them from the results.
Choose a role for this member: **Leader**, **Assistant Leader**, or **Member**.
Set the **Joined Date** and click **Add Member** to add them to the roster.
A member can only be assigned to a ministry within their own branch.
 ## Ministry roles explained
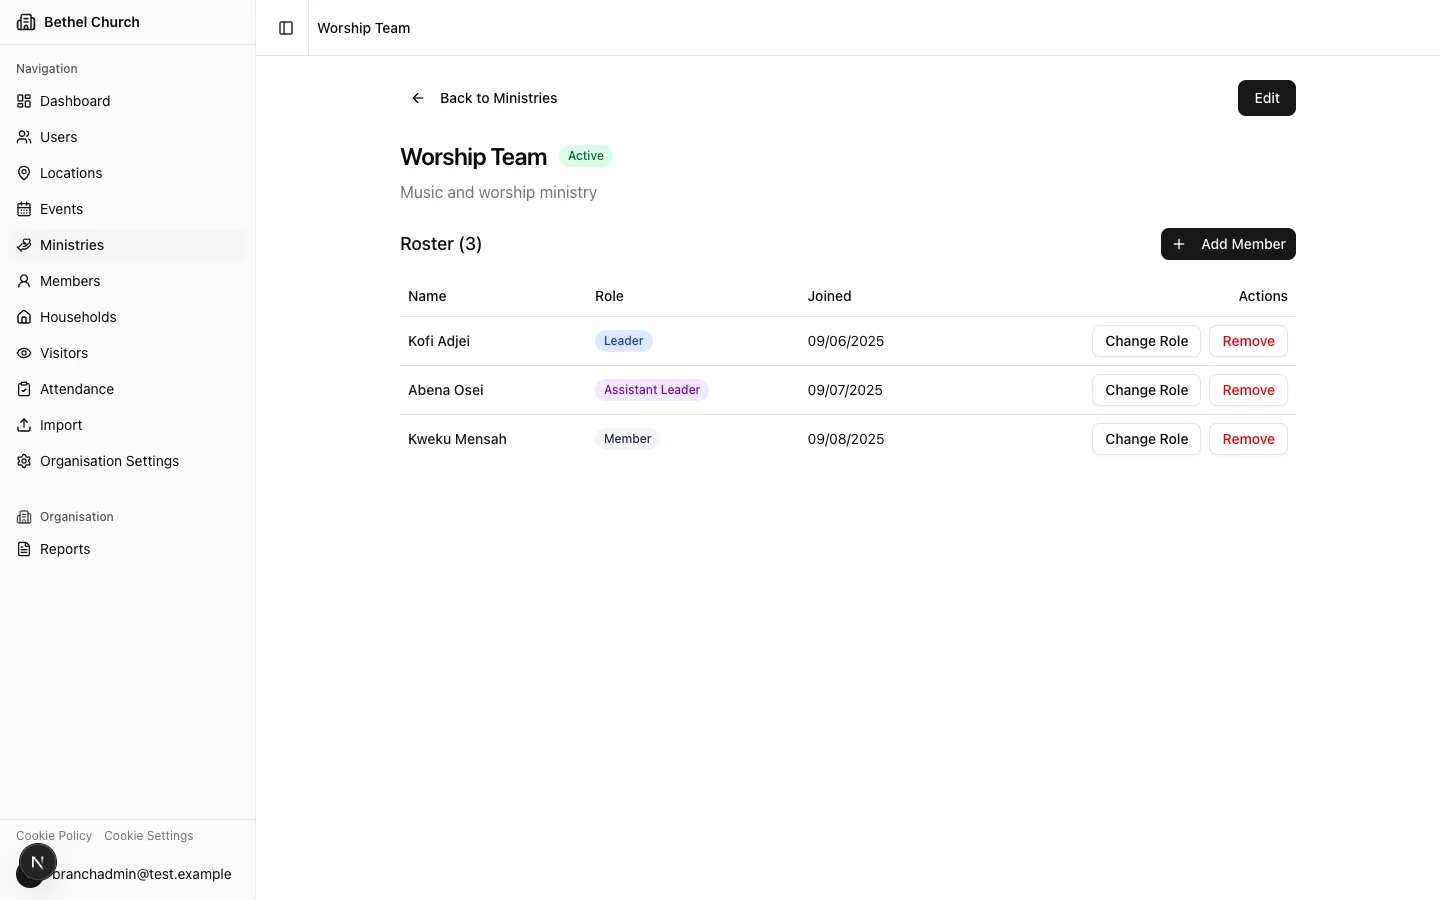
Each person in a ministry is assigned one of three roles:
* **Leader:** The primary person responsible for the ministry. Ministry leaders may have additional portal permissions in future.
* **Assistant Leader:** Supports the ministry leader in coordinating the team.
* **Member:** A general participant in the ministry.
A ministry can have multiple leaders and assistant leaders. For example, a large worship ministry might have two leaders who alternate between services.
## Removing a member from a ministry
When you remove someone from a ministry, Bethel ChMS sets a **Leave Date** on their assignment rather than deleting the record. This preserves their tenure history.
Navigate to the ministry and view its roster.
Find the member you want to remove and click **Remove**.
Confirm the action. Bethel ChMS will set a leave date on the assignment, and the member will no longer appear in the active roster.
If a member re-joins a ministry later, a new assignment record is created. Their previous tenure is preserved as a separate record.
## Viewing the roster
The ministry detail page shows active roster members, those with no leave date. For each person, you can see their name, role, and joined date.
Use the roster view toggle to choose how you want to read the roster:
* **Flat** shows each member once. If a member is in the ministry directly and through a linked group, the direct assignment takes precedence for the displayed role.
* **By group** groups members by linked group. It also shows a **Direct only** bucket for members who are assigned directly and are not active in a linked group.
## Ministry roles explained
Each person in a ministry is assigned one of three roles:
* **Leader:** The primary person responsible for the ministry. Ministry leaders may have additional portal permissions in future.
* **Assistant Leader:** Supports the ministry leader in coordinating the team.
* **Member:** A general participant in the ministry.
A ministry can have multiple leaders and assistant leaders. For example, a large worship ministry might have two leaders who alternate between services.
## Removing a member from a ministry
When you remove someone from a ministry, Bethel ChMS sets a **Leave Date** on their assignment rather than deleting the record. This preserves their tenure history.
Navigate to the ministry and view its roster.
Find the member you want to remove and click **Remove**.
Confirm the action. Bethel ChMS will set a leave date on the assignment, and the member will no longer appear in the active roster.
If a member re-joins a ministry later, a new assignment record is created. Their previous tenure is preserved as a separate record.
## Viewing the roster
The ministry detail page shows active roster members, those with no leave date. For each person, you can see their name, role, and joined date.
Use the roster view toggle to choose how you want to read the roster:
* **Flat** shows each member once. If a member is in the ministry directly and through a linked group, the direct assignment takes precedence for the displayed role.
* **By group** groups members by linked group. It also shows a **Direct only** bucket for members who are assigned directly and are not active in a linked group.
 ## Archiving a ministry
Archiving a ministry sets its status to **Archived**. You can no longer assign new members to an archived ministry, but the existing roster and history are preserved. You can reactivate an archived ministry at any time.
Navigate to the ministry you want to archive.
Click **Edit**, change **Status** to **Archived**, and click **Save Changes**.
You cannot archive a ministry while groups are linked to it. Unlink all groups first.
Use archiving when a ministry is on pause but you want to keep the history. For example, a seasonal outreach team that runs every December.
## Deleting a ministry
Org Owner, Org Admin, and Branch Admin can delete a ministry. Editors cannot delete ministries.
Deleting a ministry is a soft delete. Bethel ChMS automatically closes all active direct assignments and moves the ministry to a deleted state. Deleted ministries can be recovered within 30 days.
In the **Ministries** list, find the ministry you want to delete.
Open the ministry's actions menu, click **Delete**, and confirm the action. All active member assignments are closed automatically.
You cannot delete a ministry while groups are linked to it. Unlink all groups first.
If you just want to pause a ministry temporarily, consider archiving it instead. Archiving keeps the ministry visible in your list and preserves the roster without requiring recovery.
## Linking groups to a ministry
You can link groups to a ministry when groups represent sub-teams, cells, or fellowships that belong under the ministry. A ministry can have many linked groups, but each group can link to only one ministry.
When you link a group, Bethel ChMS adds the group's active members to the ministry roster as group-sourced members. Direct ministry assignments stay separate, so unlinking a group does not remove members who still have a direct assignment or another linked-group path into the ministry.
### Link a group from a ministry
In the sidebar, click **Ministries**, then open the ministry.
In **Linked Groups**, click **Link a group**.
Select an unlinked group from the same branch. Groups that are already linked to a ministry do not appear in the list.
Click **Link Group**. Bethel ChMS adds the group's active members to the ministry roster.
Only active, non-archived ministries can receive linked groups. The group and ministry must belong to the same branch.
### Link a ministry when creating a group
You can also link a group while creating it from **Groups**. Choose the ministry in the **Ministry** field before you click **Create Group**.
If the group is created but the ministry link fails, Bethel ChMS keeps the group and shows an error toast for the failed link.
### Unlink a group
In the sidebar, click **Ministries**, then open the ministry.
In **Linked Groups**, find the group you want to unlink.
Click **Unlink**. Bethel ChMS shows how many roster members will be removed and how many will stay because they are direct members or are in another linked group.
Click **Unlink** to remove the group link.
Unlinking closes the group-sourced roster rows for that group. It does not remove the members from the group itself.
### Group-sourced roster rows
Members who come into a ministry through a linked group are managed from the group, not directly from the ministry roster. In the ministry roster, **Change Role** and **Remove** are disabled for group-sourced rows.
To change a group-sourced member's role or remove them, open the linked group and update the group roster. Bethel ChMS keeps the ministry roster in sync.
## Change history
The ministry detail page includes a **Change History** tab. Use it to review changes to ministry details such as **Name**, **Description**, and **Status**.
## Archiving a ministry
Archiving a ministry sets its status to **Archived**. You can no longer assign new members to an archived ministry, but the existing roster and history are preserved. You can reactivate an archived ministry at any time.
Navigate to the ministry you want to archive.
Click **Edit**, change **Status** to **Archived**, and click **Save Changes**.
You cannot archive a ministry while groups are linked to it. Unlink all groups first.
Use archiving when a ministry is on pause but you want to keep the history. For example, a seasonal outreach team that runs every December.
## Deleting a ministry
Org Owner, Org Admin, and Branch Admin can delete a ministry. Editors cannot delete ministries.
Deleting a ministry is a soft delete. Bethel ChMS automatically closes all active direct assignments and moves the ministry to a deleted state. Deleted ministries can be recovered within 30 days.
In the **Ministries** list, find the ministry you want to delete.
Open the ministry's actions menu, click **Delete**, and confirm the action. All active member assignments are closed automatically.
You cannot delete a ministry while groups are linked to it. Unlink all groups first.
If you just want to pause a ministry temporarily, consider archiving it instead. Archiving keeps the ministry visible in your list and preserves the roster without requiring recovery.
## Linking groups to a ministry
You can link groups to a ministry when groups represent sub-teams, cells, or fellowships that belong under the ministry. A ministry can have many linked groups, but each group can link to only one ministry.
When you link a group, Bethel ChMS adds the group's active members to the ministry roster as group-sourced members. Direct ministry assignments stay separate, so unlinking a group does not remove members who still have a direct assignment or another linked-group path into the ministry.
### Link a group from a ministry
In the sidebar, click **Ministries**, then open the ministry.
In **Linked Groups**, click **Link a group**.
Select an unlinked group from the same branch. Groups that are already linked to a ministry do not appear in the list.
Click **Link Group**. Bethel ChMS adds the group's active members to the ministry roster.
Only active, non-archived ministries can receive linked groups. The group and ministry must belong to the same branch.
### Link a ministry when creating a group
You can also link a group while creating it from **Groups**. Choose the ministry in the **Ministry** field before you click **Create Group**.
If the group is created but the ministry link fails, Bethel ChMS keeps the group and shows an error toast for the failed link.
### Unlink a group
In the sidebar, click **Ministries**, then open the ministry.
In **Linked Groups**, find the group you want to unlink.
Click **Unlink**. Bethel ChMS shows how many roster members will be removed and how many will stay because they are direct members or are in another linked group.
Click **Unlink** to remove the group link.
Unlinking closes the group-sourced roster rows for that group. It does not remove the members from the group itself.
### Group-sourced roster rows
Members who come into a ministry through a linked group are managed from the group, not directly from the ministry roster. In the ministry roster, **Change Role** and **Remove** are disabled for group-sourced rows.
To change a group-sourced member's role or remove them, open the linked group and update the group roster. Bethel ChMS keeps the ministry roster in sync.
## Change history
The ministry detail page includes a **Change History** tab. Use it to review changes to ministry details such as **Name**, **Description**, and **Status**.